Kubernetes Architecture and Kubeadm Installation | Run nginx on (K8s)
What is kubernetes?
Kubernetes is an open source Container orchestration tool developed by google that is use to create multi enviormnet and multi container Deployement.
Why do we use of K8s?
For Production ready deployment of microservices and small apps having less failure and down time.
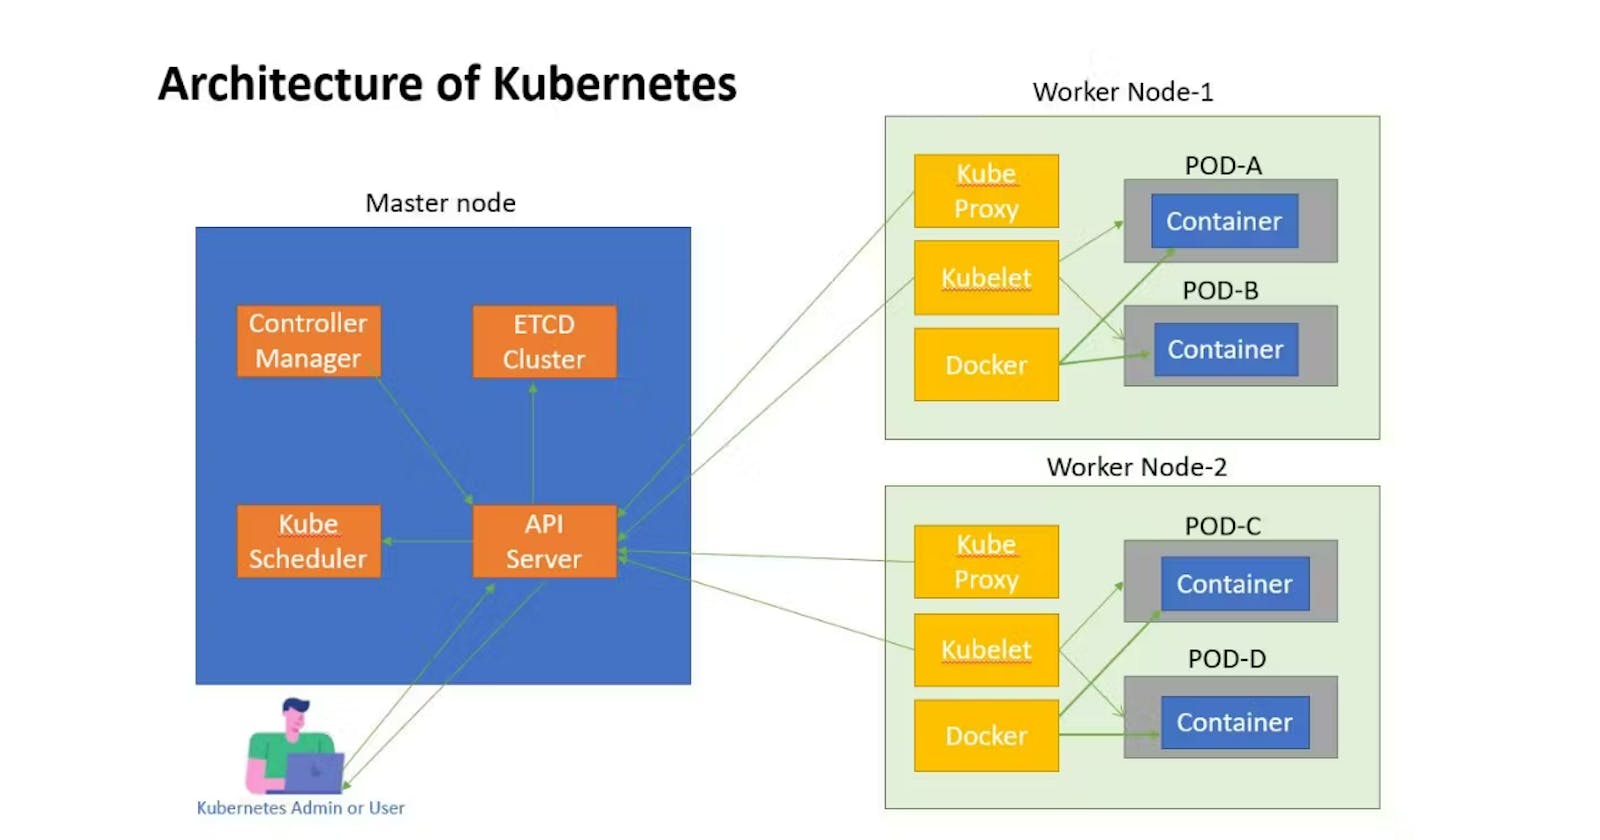
The Kubernetes architecture consists of the following components
Kubernetes API Server: The API server is the central control plane of the Kubernetes cluster. It provides a RESTful interface for communication with other components of the cluster.
Etcd: etcd is a distributed key-value store that is used to store the configuration data and the state of the Kubernetes cluster.
Kube-Controller Manager: The controller manager is responsible for managing the various controllers that are responsible for maintaining the desired state of the cluster.
Kube-Scheduler: The scheduler is responsible for scheduling the containerized workloads to the worker nodes.
Worker Node Components: The node components are responsible for running the containerized workloads. They include:
Kubelet: The kubelet is responsible for managing the containerized workloads on a node. It communicates with the API server to receive instructions on how to manage the containers.
Container Runtime: The container runtime is responsible for running the containers on a node. It could be Docker, rkt, or any other container runtime that supports the Kubernetes Container Runtime Interface (CRI).
Kube-proxy: The kube-proxy is responsible for managing the network connectivity of the containers running on a node.
Kubeadm Installation
Prerequisites :
Two Ubuntu 20.04 instances (one master and one worker node)
Use T2 medium for master node.
Commands to Run on both Node Master and Worker
Install Docker by below commands :
sudo su apt update -y apt install docker.io -y
systemctl start docker systemctl enable docker
Add below key to install kubeadm
curl -fsSL "https://packages.cloud.google.com/apt/doc/apt-key.gpg" | sudo gpg --dearmor -o /etc/apt/trusted.gpg.d/kubernetes-archive-keyring.gpg echo 'deb https://packages.cloud.google.com/apt kubernetes-xenial main' > /etc/apt/sources.list.d/kubernetes.list
apt update -y apt install kubeadm=1.20.0-00 kubectl=1.20.0-00 kubelet=1.20.0-00 -y
Run below commands only on Master node
sudo su kubeadm init
To start using your cluster, you need to run the following as a regular user:
mkdir -p $HOME/.kube sudo cp -i /etc/kubernetes/admin.conf $HOME/.kube/config sudo chown $(id -u):$(id -g) $HOME/.kube/config
Alternatively, if you are the root user, you can run:
export KUBECONFIG=/etc/kubernetes/admin.conf
kubectl apply -f https://github.com/weaveworks/weave/releases/download/v2.8.1/weave-daemonset-k8s.yaml
Print Join commands for worker node
kubeadm token create --print-join-command
Run commands to check node on Master node
kubectl get node

Go to AWS instance Master node-->Edit inbound rules-->> Add port 6443 open so that worker node can join.

Now if run join token commands on worker node , node will join in cluster group.
Worker node output

Master node output ;

Now the worker node has joined.
Run this commands on Master node.
kubectl run nginx --image=nginx --restart=Never
ngnix pod will be created and on worker node an nginx image will be created and running.


Conclusion :
In this blog we gone through the kubernets architecture and installation of kubeadm and setup a master-worker node cluster and run a nginx server image on worker node.
